DIY: Trailer Wiring 101
By John Tiger
Most boaters shy away from anything to do with 12-volt DC wiring, even though it’s the basic system present on most boats and boat trailers—and it’s an easy system to troubleshoot and work on.
This primer should help wary boaters to keep their trailer wiring working properly, and even replace the entire system with a new one. Often with boat trailers, it’s cost-effective to simply replace all the lights and wiring at the same time rather than do patch-work replacement of one light, one lens, one bulb, etc.—especially if the lights and wiring on your trailer have seen better days.
WHAT’S NEW
Boat trailer lights and wiring must work in harsh conditions. LED lights are popular as replacements for incandescents. They’re much more reliable, don’t corrode, and don’t burn out when submerged. While they’re still about twice as expensive as the older incandescent kits, they’re coming down in price as they become more commonplace.
YOU CAN DO IT
With a working knowledge of the proper trailer wiring color code and basic hand tools, a few hours is all it takes to rewire a typical boat trailer. Kits are sold for reasonable prices at any big-box store, auto parts chain, or trailer parts and marine accessories stores.
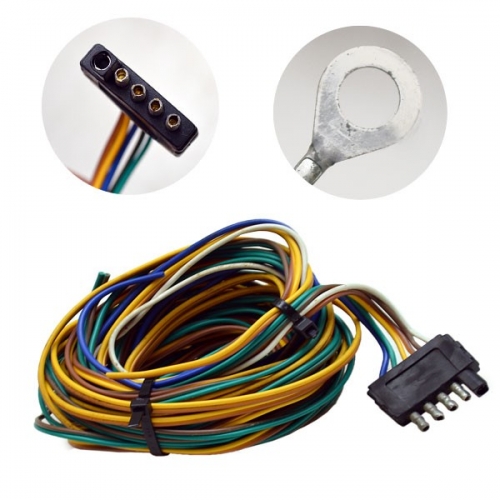
A kit for a simple trailer typically costs less than $60. Most kits include a set of taillights, a set of marker lights, a complete harness, instructions, wire clips, and connectors. Kits will be designated for “under 80” and “over 80” trailers -- this references the trailer width in inches. If your trailer is a smaller one, the “under 80” light kits will work fine; over 80” wide need extra side marker lights and clearance lights, and these are included in the kit.
To rewire and install new lights on your trailer, you’ll need:
- wire cutters
- wire stripper/crimpers
- wrenches
- electrical tape
- And, to avoid wire connection problems, use heat-shrink sealed connectors, butt connectors, and ring terminals. Don’t use the cheap ScotchLok connectors that come with the kit.
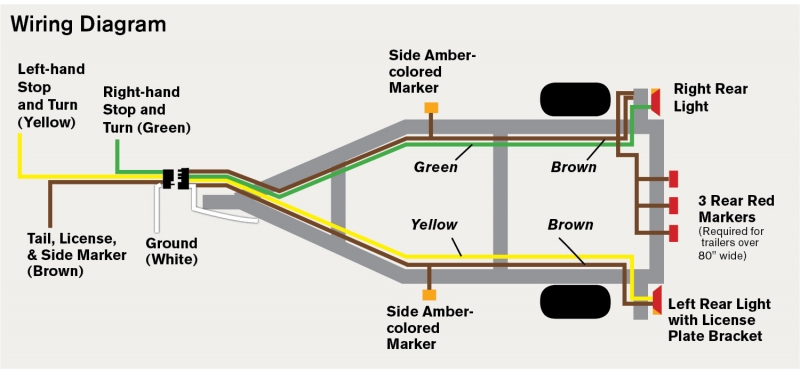
WIRE CODE
White = Ground.
Brown = Running lights.
Green = Right side turn/brake lights.
Yellow = Left side turn/brake lights.
Blue = Backup solenoid (5-wire flat plugs only, for trailers with surge brakes).
There’s an easy way to remember the correct basic wire code for US trailers:
Green = color of grass. When driving, the grass is on the trailer’s right; green wire goes on the right side of the trailer.
Yellow = color of center line on road. The yellow line is on the trailer’s left; yellow wire goes on the left side of the trailer.
Now, all you have to remember is brown (running lights) and white (ground).
How To Rewire
Run one brown wire plus the green wire down the right side of the trailer frame. Use the supplied metal clips to keep the wires in place on the frame without any sagging or loops hanging down.
Do the same for the left side, running one brown wire and the yellow wire down this side.
The brown wire gets connected to the marker lights that are mounted to the sides of the trailer frame. You may have to split off a short length to reach these marker lights. Don’t forget to ground these lights to the frame (more on this below). The brown light wire must connect to the appropriately marked terminal on each tail light. If your trailer has side and/or rear marker lights, the brown wire must also be run to these lights.
The rear lights are usually mounted together, to one strip of metal or plastic that attaches to the trailer frame in the center.
The green wire runs to the right side tail light, connected to the appropriately marked terminal. The yellow wire is run to the left side tail light.
Lastly, the ground wire is attached directly to the trailer frame, at the tongue. Do not rely on the trailer ball-to-coupler connection for your ground, as many do. Be sure to leave enough slack up front at the coupler for the flat connector to reach your tow vehicle’s receptacle. Protect the harness lead with wire covering, such as split loom or spiral wrapping.
Great job!