Leak Detection
As any boat owner can attest, it isn’t just crotchety old Aunt Emma that suffers from annoying leaks. From the water a boat floats in, to the myriad of liquid and gas carrying systems onboard (fuel, sanitation, LPG, etc) the potential for leaks abound, causing anything from spoiled food and equipment damage to sinkings and even explosions.
The sudden appearance of water in the bilge or a mysterious fluid in the engine compartment should be cause for alarm. After all, if you don’t know what is leaking, it could be anything – possibly even a warning sign that some vital component is on the verge of failure. Leaks are your boats way of telling you that something is wrong, meaning it’s imperative to diagnose and correct them as soon as possible.
When tracking down leaks, patience and careful observation are virtues, although a good sense of smell doesn’t hurt in some cases (such as with fuel or sanitation system leaks). Color and consistency of the leaked fluid itself can also point to likely sources, coolant and transmission fluid leaks being a good example.
Tool-wise, when leak-hunting you’ll need a good source of lighting, such as a bright flashlight or drop light. Depending on the type of leak, other possible items could include paper towels, a wet /dry vacuum, a small inspection mirror, children’s felt markers or sidewalk chalk, a perhaps a can of Soft & Dry underarm deodorant (more on the Soft & Dry trick in a moment).
Bilge Water
Water in the bilge is never a good thing, particularly in large, increasing quantities. The first thing to determine in the case of clear water leaks is whether the water is salt or fresh. If fresh (unless the boat itself is in fresh water) the potable water system is the likely source (discounting rainwater, which could also be a possibility if the water appears after periods of rain).
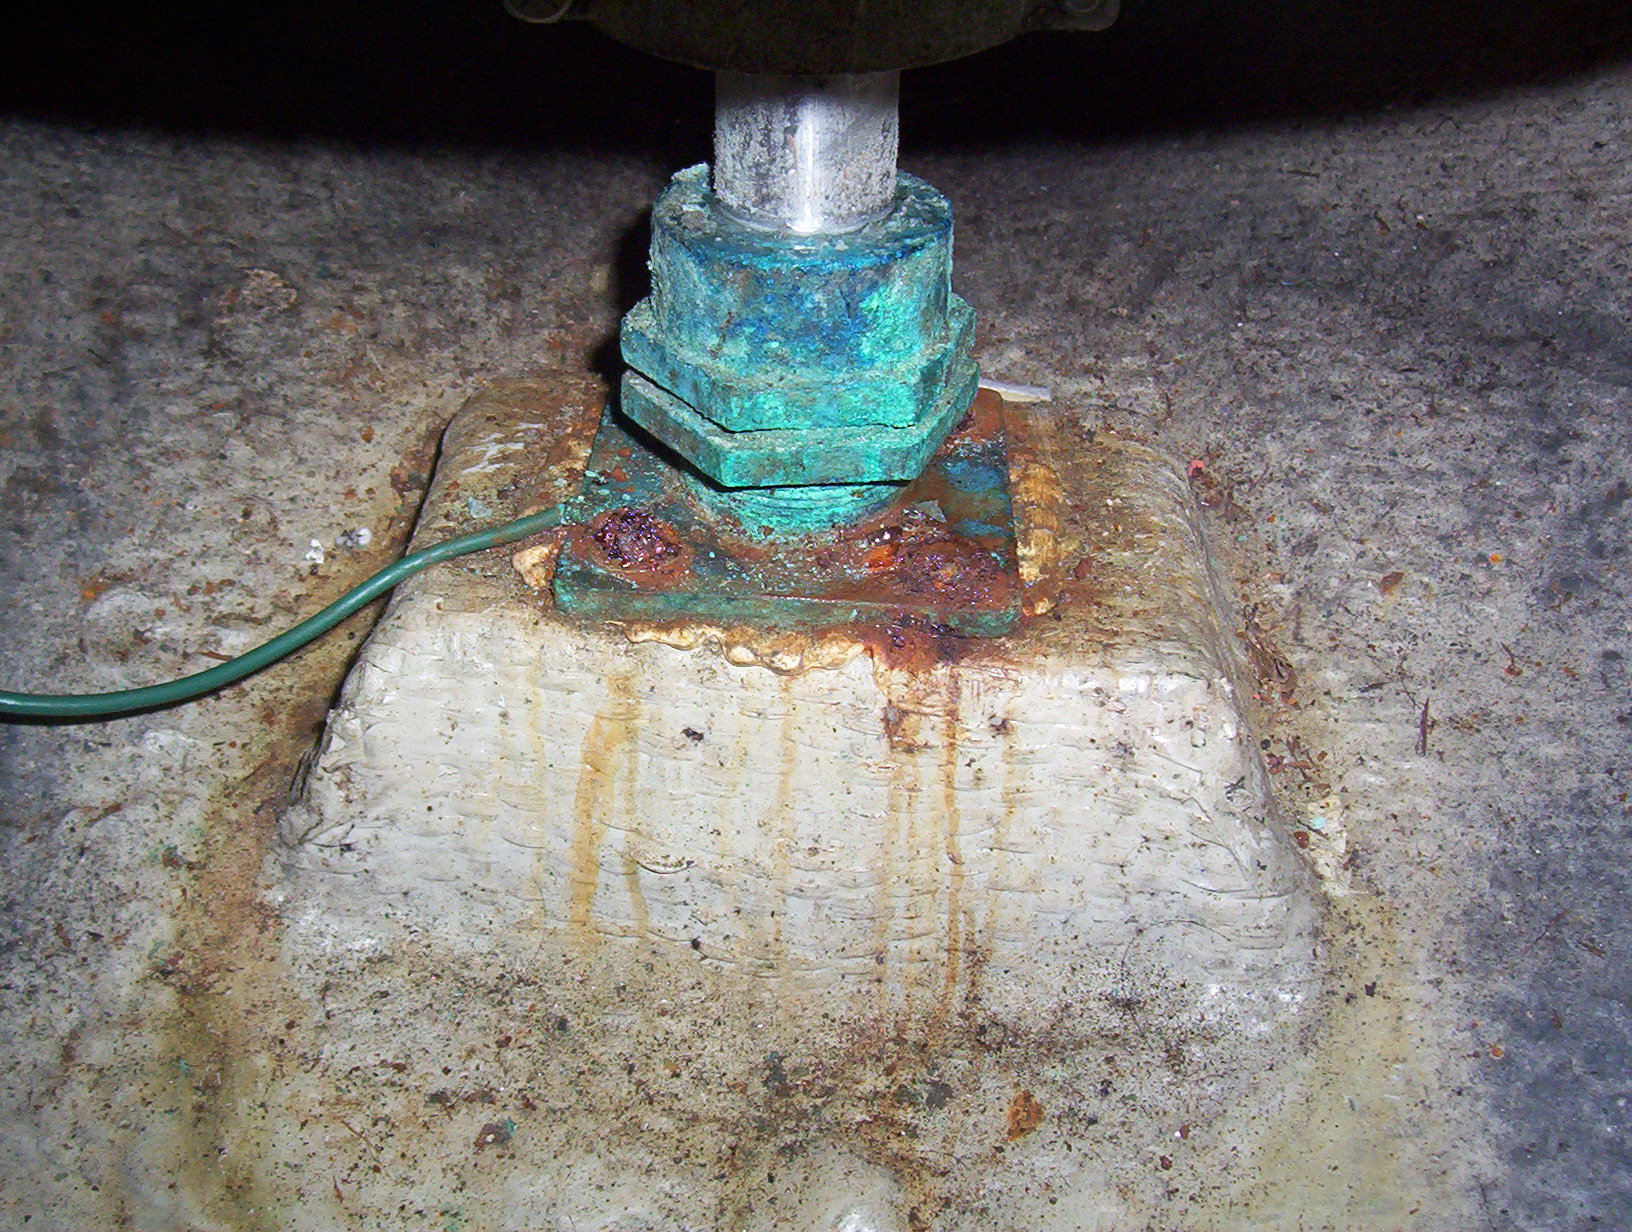
If it’s saltwater, unless you’ve run aground or otherwise damaged the hull, likely suspects include any hull penetration below the waterline – shaft glands, transducers, thru-hulls, strut fasteners, etc. Sailboats can also have issues with leaking keel bolts, while powerboats can leak around trim tabs, swim platform mounts or U-joints and bellows (for those with stern drives).
If the leak only occurs while underway, the engine raw water cooling system may be suspect, as well as stuffing boxes for the shaft or rudders. Traditional compression type stuffing boxes for the engine shaft should typically leak no more than three to four drops per minute while underway, however they shouldn’t leak at the dock. Rudder posts may not leak a drop while in the static position, but gush water while underway. Look for tell tale sighs of corrosion or verdigris (in the case of bronze hardware) which typically signifies a leak.
For sailboats, leaks underway when heeled could indicate anything from loose keel bolts to back-siphoning via a leeward through-hull with an inadequate riser loop installed (bilge pump discharge hoses are a common source of this).
Tracking Down Bilge Leaks
Unless lucky enough (from a leak-tracking standpoint anyway) to spot a steady stream of water, you’ll likely have to do a little investigative work to pinpoint the source of a leak. This can be particularly challenging, as the water may drip or become noticeable feet away from where the actual leak is.
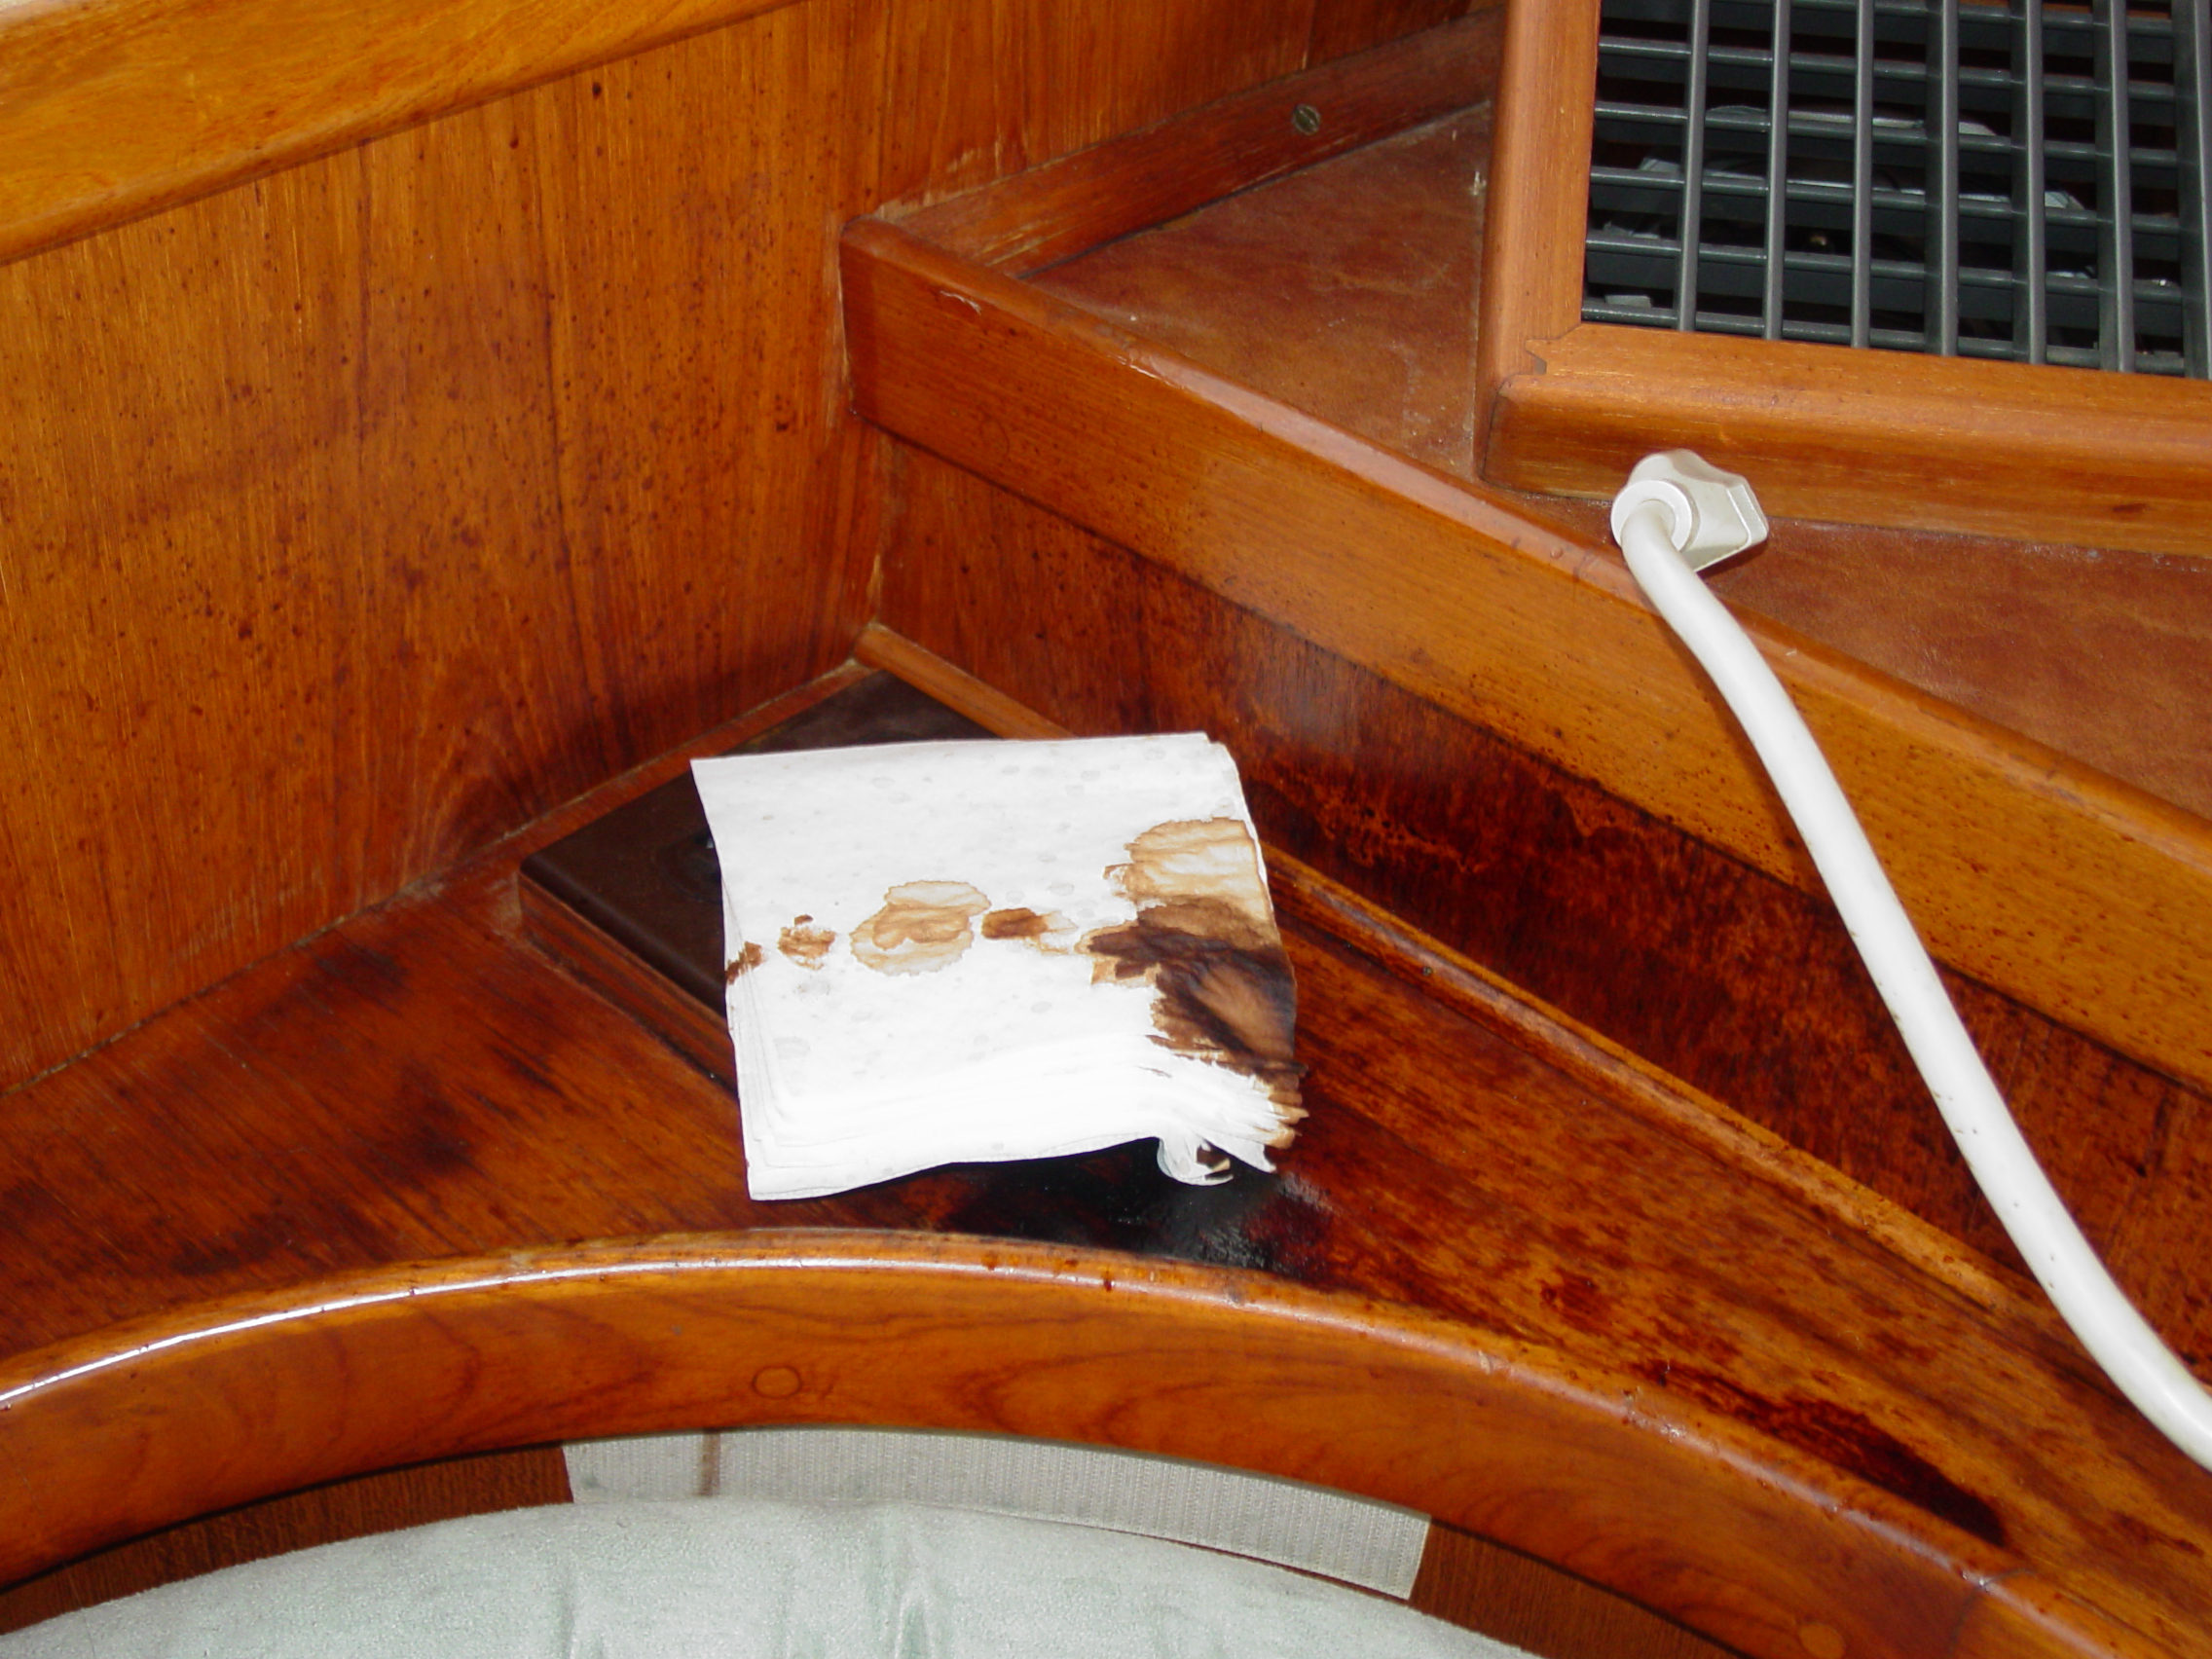
The first step in locating a non-obvious bilge leak is to pump or vacuum the section of bilge where the leak seems to be coming in, dry it as much as possible, then place a folded paper towels in the bilge fore and aft of the area. Wait a bit, then check to see if either towel is damp. If one of the end towels is wet, then the adjacent bilge areas is suspect, meaning you simply move to that area and repeat the process. Work through each of the bilge compartments to locate the one where the water is actually entering.
Once you’ve narrowed it down to one section of bilge, there are a couple of ways to determine where the water is coming from. One option is drying the bilge and covering it with paper towels, then simply watching to see which ones get wet first. Another is drawing a few lines along both sides of the bilge with a children's water washable felt pen or sidewalk caulk – check back after a bit, look for runs, then work your way up the hull until you find the source of the leak.
Finally, if all else fails you may want to haul the boat and check the exterior for damage, at which point you can also run some fresh water into the bilge and look for wet areas (once the hull is dry).
Engine/Generator Exhaust System Leaks
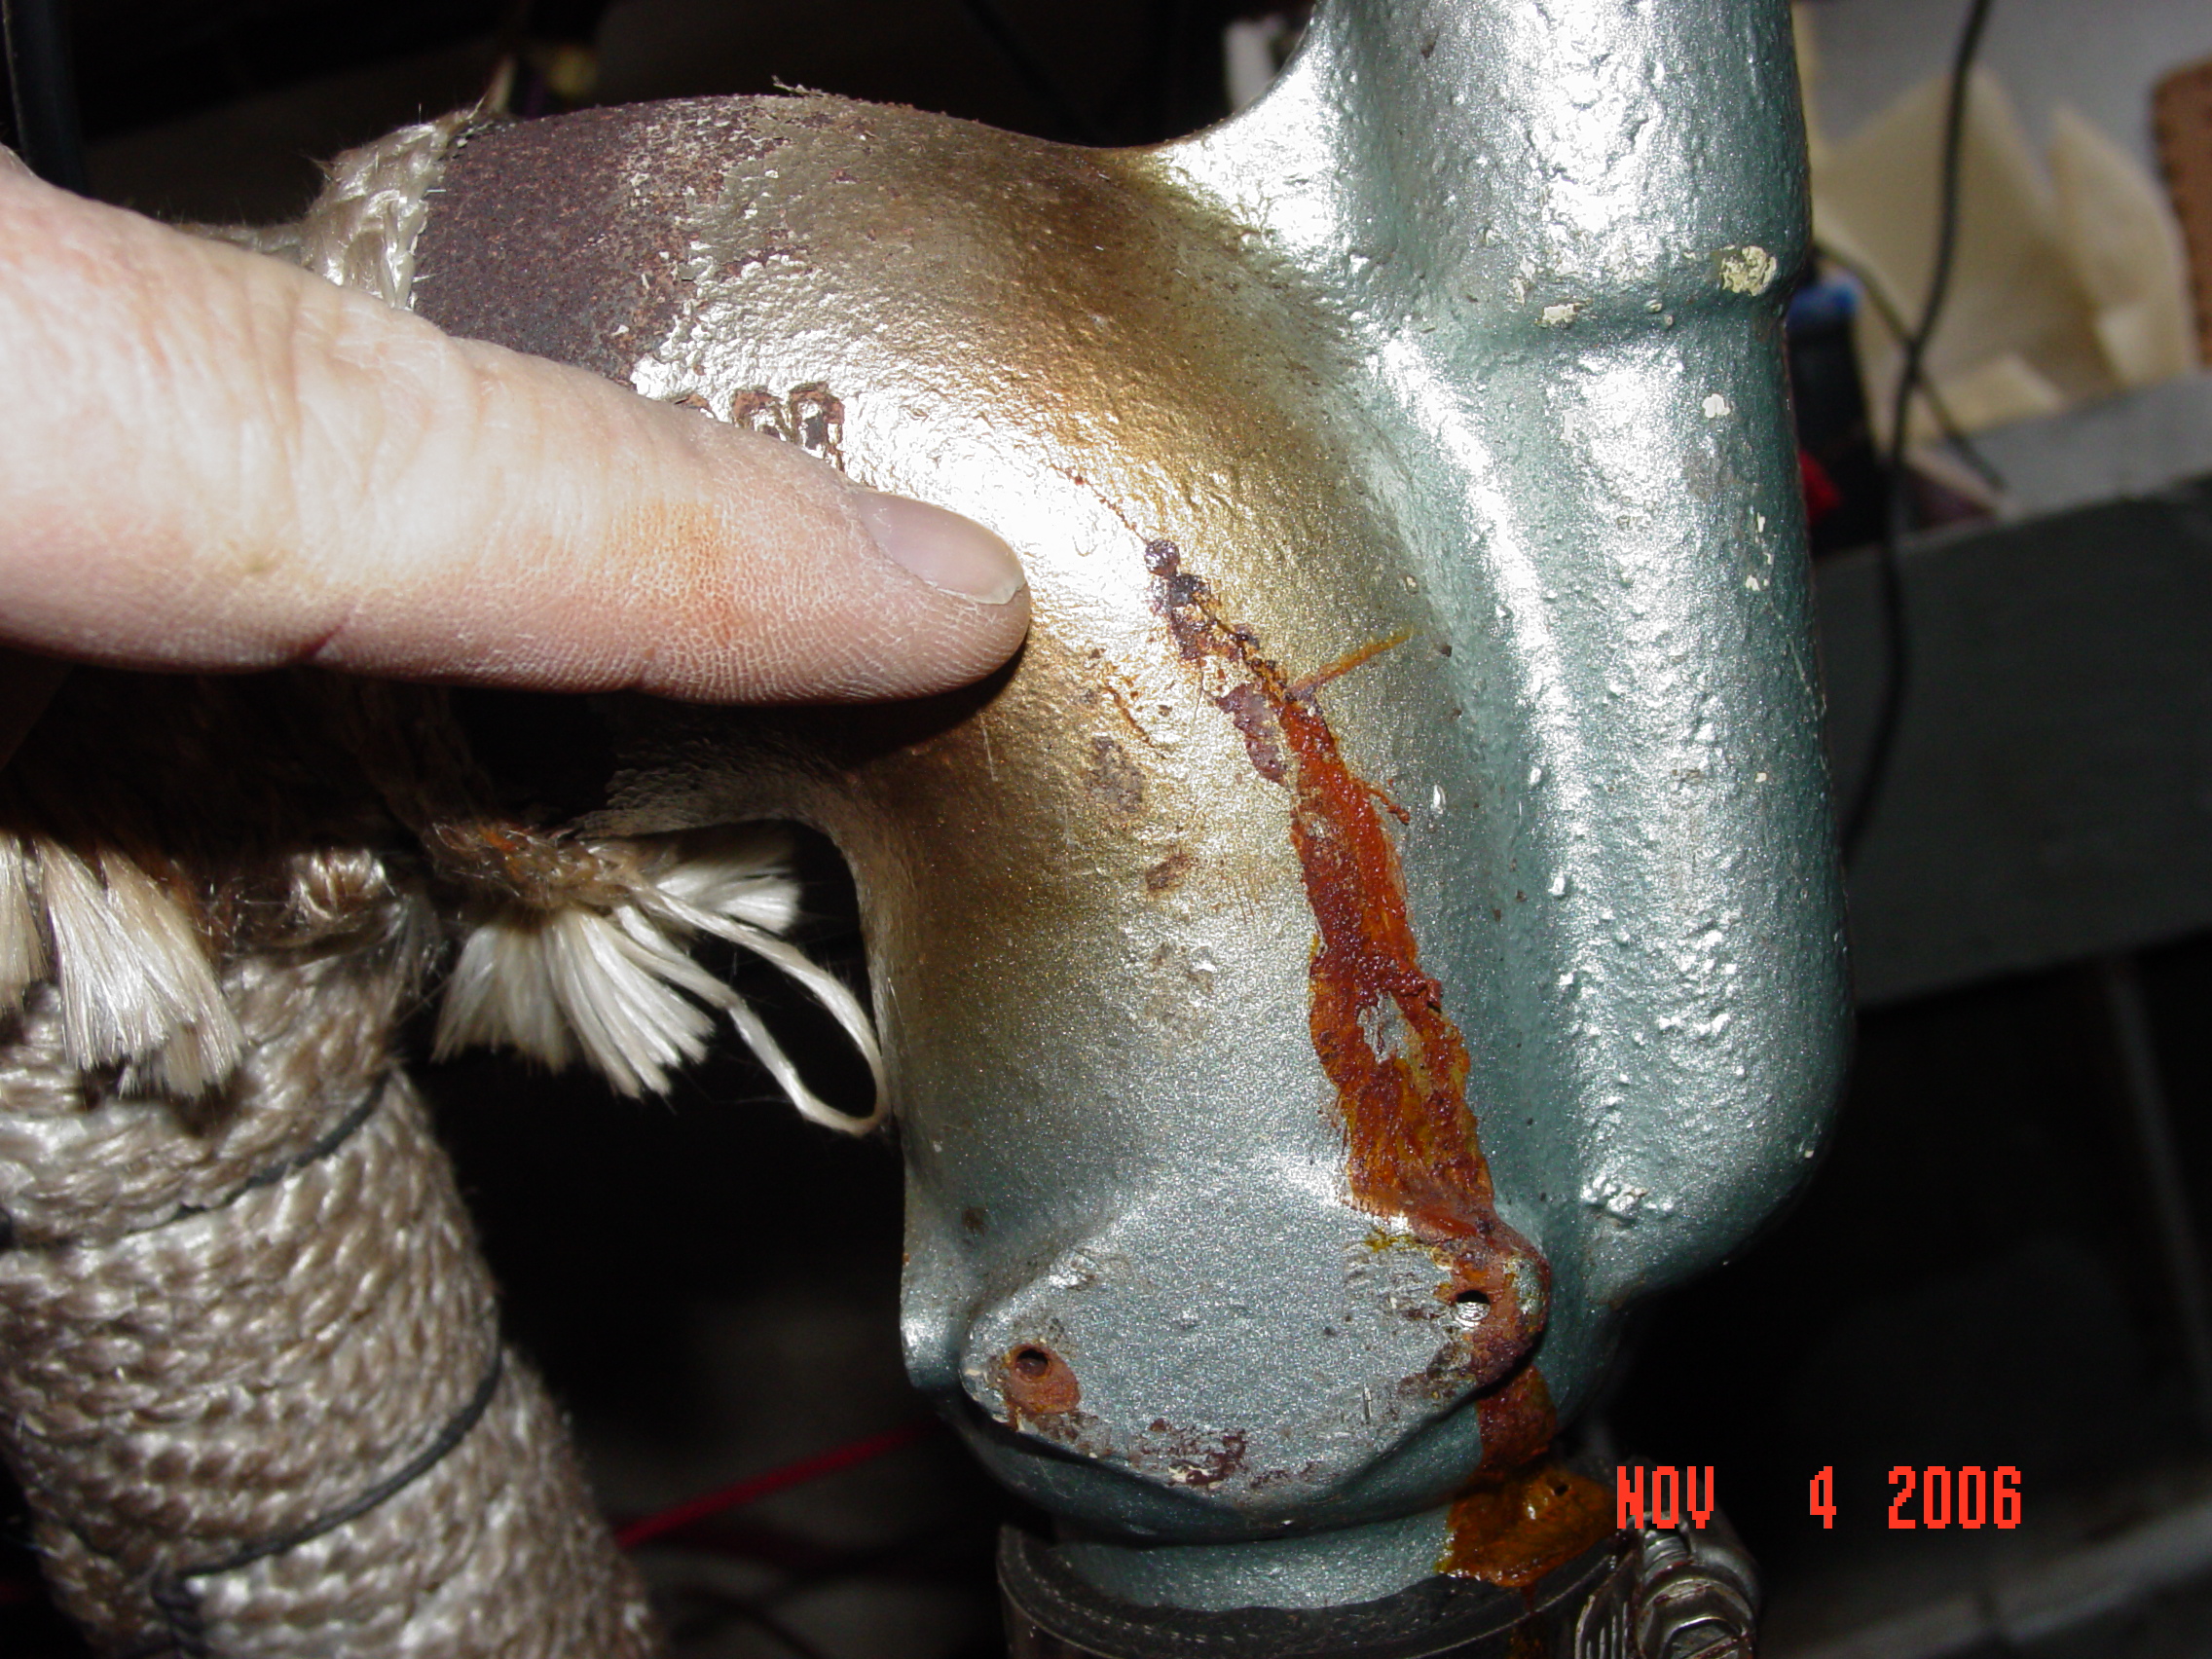
Exhaust system leaks are a serious issue, not only because of the potentially catastrophic engine failure they can herald, but also due to the possible introduction of CO into the interior of the vessel (a situation with potentially deadly consequences). Dry exhaust leaks (between manifold and block for example) can often be found by feeling for escaping exhaust or holding tissue paper near the suspected area and watching for movement. Wet leaks in manifolds, exhaust risers, mufflers, etc., are normally accompanied by corrosion, stains, or “running rust” originating at the leak itself.
Lacking the above signs, another option is to clean the area completely (non-flammable aerosol disc brake cleaner works well), then spray on the deodorant mentioned earlier and let dry (this could take five or six hours on a cold engine). Once dry, the deodorant leaves a uniform coating of white powder that not only makes a leak easy to spot, but is also easily removed.
Engine Fuel System Leaks
When it comes to fuel system leaks, common sense dictates they must be found and fixed sooner, rather than later. For suspected fuel leaks at the engine (this works for oil, antifreeze, or any other engine leak as well) clean and dry the area beneath the engine, then cover with paper towels or oil pads and check for wet areas (bearing in mind the engine may have to be running to generate the leak).
If you suspect fuel fitting leaks, clean the connections with alcohol and tie a little wad of toilet paper or paper towel on each fitting. Go grab a cup of coffee, then come back and look for evidence of leaking.
LPG System Leaks
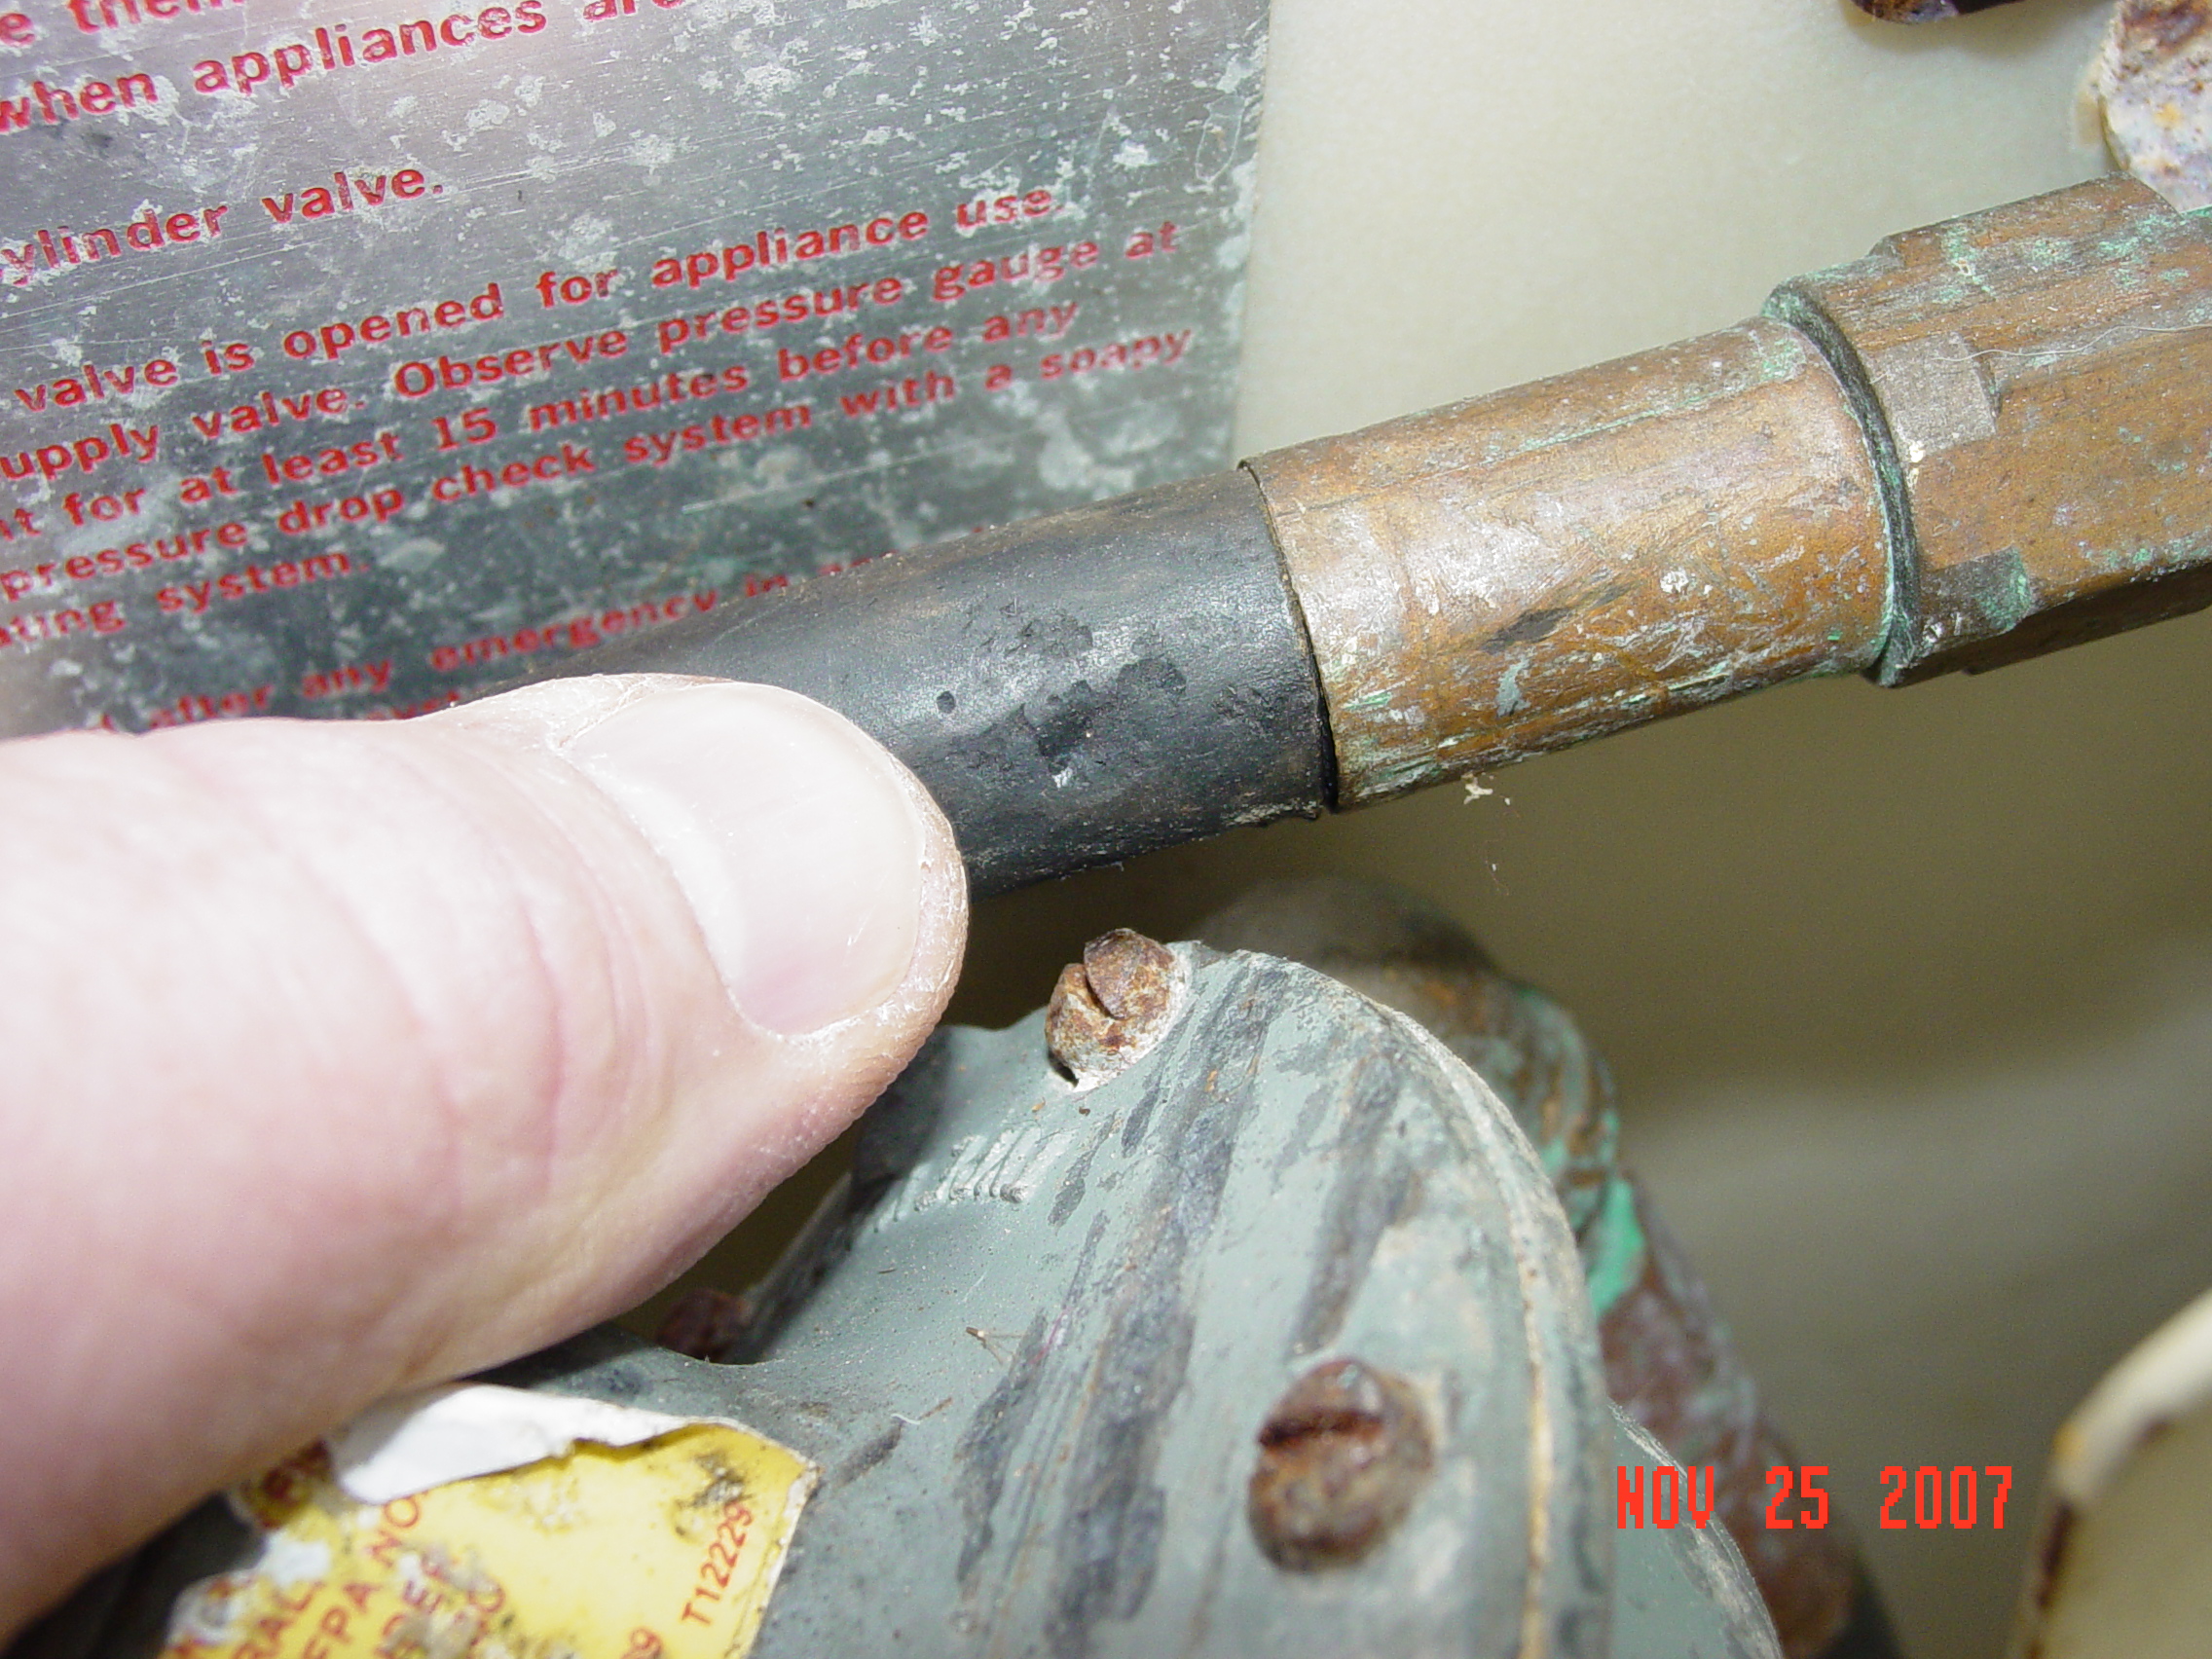
If there is any system onboard that has to have a “no leak” policy, it’s LPG. The best way to check the health of your LPG system is to conduct a leak down test. Your LPG system will (or should have) a pressure gauge installed on the cylinder side of the pressure regulator. Its primary purpose in life is to help test the system for leaks.
Leak down tests are easily performed and should be conducted on a regular basis (weekly ideally, but monthly at a minimum). With your stove valves in the off position, open the LPG tank manual supply valve and (if so equipped) the electronic solenoid valve to pressurize the system, then close the tank supply valve, leaving the solenoid valve open.
Observe the pressure gauge reading. The pressure indicated should remain constant for at least three minutes. A drop in pressure indicates a leak, at which point the entire system would be checked with a leak detection fluid or detergent solution to locate the leak (test solutions must be non-corrosive and non-toxic).
The leak of course, must be found and repaired prior to retesting and operating the system.
A Couple of Important Points:
1. Unless you want top billing at the Darwin Awards website, NEVER use a flame to check for leaks.
2. Never use solutions containing ammonia. Ammonia, present in some soaps and detergents, can attack brass fittings.
3. Always seek the advice of a professional if unsure how to inspect, tests, or make repairs to your LPG system.
After cooking, leave one burner ignited and turn off the solenoid or tank valve. When the burner goes out, close the burner valve — this empties the line of gas and prevents leaking should a burner valve fail to seal. It’s also a good idea to close the tank valve in addition to the solenoid valve when the system is not in use, particularly if you plan on leaving the vessel for an extended period of time (the solenoid should always be closed when the system is not in use).
Sanitation
Your nose is a key ally in the war against funky head odors, however your eyes play a big part as well. Start by inspecting each of the hose connections for your system (toilet bowl outlet, Y valves, fittings) while looking for stains, rusty hose clamps, and the like. Give each hose clamp a touch of the screwdriver to check for tightness during your inspection and replace any that are inoperative or otherwise damaged.
Inspect the toilet itself for leaks, particularly around the base. If it hasn’t been done in a while, consider rebuilding the toilet as a preventative measure against future leaks. If there are no leaks to be found, the sanitation hose itself could be the issue due to permeation, particularly if the hose is older. To verify this, wipe a section of the hose with a clean, damp cloth (warm water works best for this) place it in a Ziplock© bag, then take it above decks in the fresh air (to get away from the smells in the head itself).
Once outside, open the bag and take a sniff. It should be obvious if the hose is in need of replacement.
Low spots in your sanitation system hoses can contribute to permeation, so try to keep hose sloping up or down to promote proper drainage. Holding tank vents are another source of odors, although not in a leaky sense. A vent that’s clogged or is too small in diameter can also contribute to head odors.
Article by Captain Frank Lanier
Captain Frank Lanier is a SAMS® Accredited Marine Surveyor with more than 40 years of experience in the marine and diving industry. He’s also an author, public speaker, and multiple award-winning journalist whose articles on seamanship, marine electronics, vessel maintenance and consumer reports appear regularly in numerous marine publications worldwide. He can be reached via his website at www.captfklanier.com.