Outboard Flushing the Right Way
By John Tiger
It sounds simple, but there is a right and a wrong way to perform this essential task. In freshwater lakes and rivers, debris such as sand, muck, wood flotsam, and garbage are always problems for engine-cooling systems. In coastal areas, salt and brackish water raise havoc with corrosion. No matter your boating locale, flushing your outboard after use should be part of your boating routine.
Why Flush?
Operating an engine in sandy, silty, or muddy water dictates the need for periodic flushing. All of the outboard manufacturers recommend flushing an outboard (according to the procedures outlined in the engine owner’s manual) after every use in salt, brackish, dirty, or polluted waters. This reads pretty much the same way in the “Maintenance” and “Engine Flushing” sections of all owner’s manuals from BRP/Evinrude, Honda, Mercury, Suzuki, Tohatsu, and Yamaha.
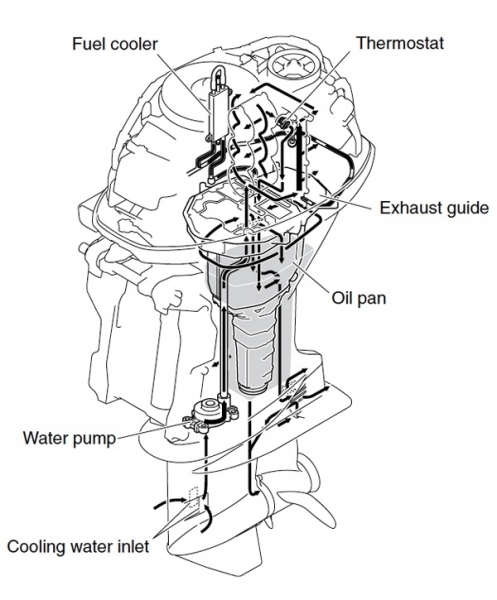
Algae blooms, muck, and sand can clog an engine’s cooling passages and require disassembly and cleaning if buildup is allowed. For coastal boaters, salt and brackish water is a corrosive killer of the aluminum from which outboards are made, so flushing every time after saltwater use is a must.
The Old School Way
Flush muffs are the most common way to flush an outboard; they’re available at most marine stores and online resellers, they’re inexpensive, and easy to use. Connect to a garden hose, fit the muffs over the engine’s water intakes on the sides of the gearcase, turn the water on, start the engine, and let it run.
That’s it… with the following precautions:
- If your engine has additional water intakes that are not being directly fed water via the flushing muffs, they must be sealed off with a bit of duct tape or overheating may occur.
- If your engine doesn’t have water intakes on the sides of the gearcase, you will need a special type of flushing attachment that covers the front of the gearcase. These can be purchased from aftermarket shops.
- When attaching the muffs, be sure they cover the water inlets completely and don’t pop or slide off when the water is turned on.
- Be vigilant, and do not leave the engine while it is flushing. Watch the engine’s “tell-tale” overboard water indicator to ensure that the engine is pumping water.
- The engine should be kept in neutral and should not run above a fast idle speed (1000 rpm maximum).
Built-In-Flushing Attachments
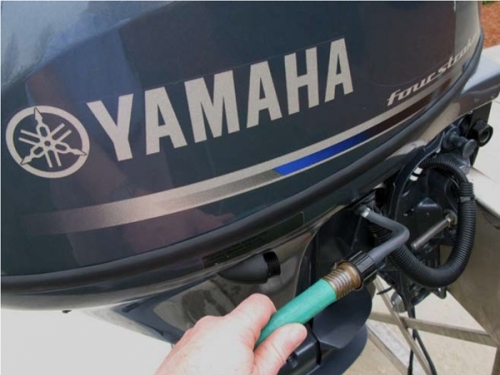
Built-in garden hose attachments are a standard part of many outboards manufactured in the past decade or so. These attachments make flushing easier, because the engine usually does not need to be running (and in some cases, should not be) to accomplish the flushing procedure. Simply check to see if your engine has this attachment (look in the owner’s manual), find the connection point, hook up a garden hose, turn on the water, and let it flow for 10 minutes. This is handy if you can’t start the engine (dead battery, for example) or if your neighbors would balk at your engine’s noise.
Flushing Bags
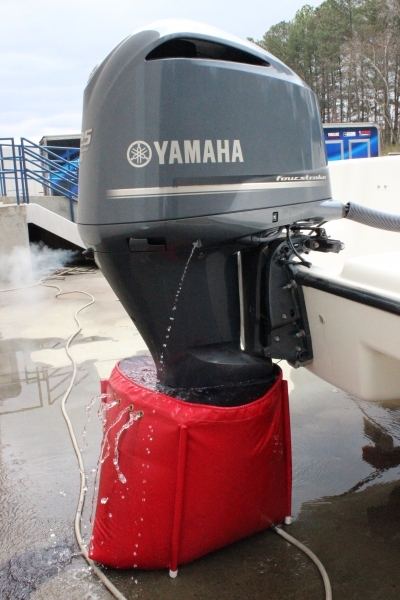
Flushing bags are soft-sided, heavy plastic/vinyl bags with a support framework, designed to be fitted up and around the lower end of an engine and fully enclose it. A garden hose is attached to fill it and keep water circulating. The engine is then started and runs much the same as with a flush muff attachment. Flush bags allow for engine-on flushing without the loud noise of the engine’s open exhaust. Just go online and Google “outboard flushing bag”- several options will pop up.
As with other flushing devices, caution must be exercised:
- The bag must fit snugly around the engine’s midsection, and be tall enough to reach well above the water intakes.
- The propeller should be removed before installing the bag.
- As with a flush muff attachment, engine speed should be kept to a fast idle, no more than 1000 rpm. The engine should be kept in neutral.
Manufacturer’s Recommendations
Most outboard manufacturers’ flushing recommendations are similar. All of them make a statement about ensuring that all water is drained from the engine after flushing. This is especially important in freezing climates, so that there is no water left inside the engine which could then freeze and cause damage.
CONCLUSIONS
This writer's recommendation for flushing may be old-school, but sometimes the old ways are the best ways. After conferring with several highly-trained and experienced outboard technicians (with a combined experience level of more than 150 years), my recommendation is to use a method that allows starting and running the engine for at least five minutes.
Why? A warm engine with warm water running through it will work better at dissolving sand, mud, algae, and other deposits in the engine than a cold engine with cold water will. The only way to get warm water coursing through the engine's cooling passages is to run it and allow it to reach operating temperature. While cold-water flushing with the engine off is better than not flushing at all, a warm water, engine-running flush is the best method available and should be employed when possible.