Water System Autumn Maintenance
Nothing stops a vacation faster than a problem with the fresh water system – be it leaks, smells, plugs or loss of pressure! Any of these can make living aboard for more than a day-trip strenuous, and in many cases can take the joy and comfort out of being aboard.
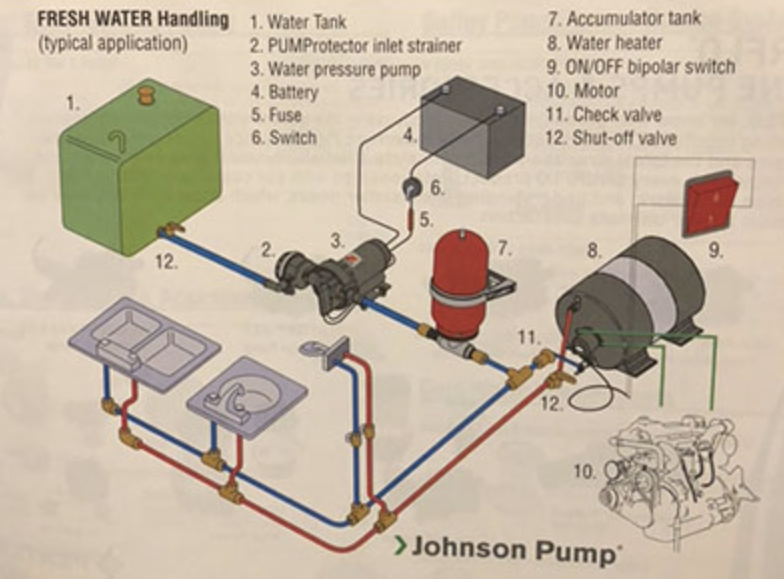
A typical water system incorporates multiple elements:
Deck inlet – a fitting on the deck marked ‘Water’ is where water can be added (via hose from shore) into the boats water tank
Water Tank – water added to the deck inlet occupies space in this tank
Fresh water pump – a pump that pressurizes the system, drawing water from the tank, and pushing it to the faucets. Typically an electric pump, found on the 12V/DC panel. The pump is designed to run until the system is pressurized, then shuts off automatically. Once pressure is released, the pump will turn back on, keeping the pressure constant.
Piping – can be flexible or rigid plastic. Increasingly, I’ve seen PEX tubing as a cost effective solution. Piping is typically colour coded – blue, or blue stripe for cold water lines, and red/red stripe for hot water
Hot water tank – a tank that heats water using electricity. Hot water tanks are typically 110V and found on the AC panel
Faucets – usually found in two or more locations aboard: the galley and head are most common.
Head – a marine toilet. The most common is a unit that includes a lever to both pump water into the bowl after use, and to pump waste out into a holding tank
Waste Tank – a holding tank for waste from the head
Waste deck fitting – where a shore-based pump can be attached to remove the waste from the waste tank (called a ‘pump out’)
Each part of the fresh water system is straightforward, simple and cost-effective to upgrade and maintain.
Where do things go wrong? Here are 4 examples:
1) Leaks – because the system is pressurized, fittings and connections must be tight and sealed. Over time, connections can loosen and require re-sealing. Additionally, especially in the pump and in the head, seals can loosen and O-rings can shrink, causing leakage. Luckily, manufacturers of both marine toilets and water pumps have servicing kits available to replace worn parts. In areas where connections have loosened, either replace the connectors, or re-tighten using Teflon tape.
2) Smells – sitting water and waste will allow bacteria to grow, especially aboard a hot boat in the summer! Water tanks and lines should be periodically flushed out and cleaned (there are a number of products available that can be added to fresh water tanks to kill bacteria in both the water and hot water tanks).
3) Loss of pressure – typically associated with a leak somewhere in the system: a faucet that doesn’t close all the way, a hot water tank drain valve left open, a seal in the head pumping mechanism, or a faulty water pump are common causes.
4) Blockage – ‘gunk’ in the water tank (or from sea-water if the head draws from a seacock), and too much toilet paper are the most common causes! A few preventative tips: make sure that there is a strainer between the water tank and water pump to remove any gunk. If the head draws in seawater, a strainer can be fitted here, too). Use marine-grade, biodegradable TP – it breaks down easily and won’t cause blockages (at least not as many).
Winterizing/layup:
It’s important to winterize the fresh water system by draining all of the water and by running antifreeze through each component to ensure that it is protected from freezing damage. Here are a few basic steps to take:
1) Drain the water tank – turn on the water pump, and open all the faucets until no more water drains. Turn the water pump off.
2) Drain the hot water tank and disconnect the lines – hot water tanks have both a pressure release valve and a drain – open the drain until water is gone. Next – remove the two hoses the bring water TO the hot water tank, and exit FROM the hot water tank. Find an appropriate connector to connect these hose together. This creates a loop, so that any antifreeze that is pumped through the lines wont enter the hot water tank – antifreeze will damage the heating elements in the water tank – don’t skip this step!
3) Located the water pump and disconnect the line from the water tank. Replace this line with a new hose running to a bucket full of antifreeze. Close faucets (hot and cold) and turn the water pump on. The system will pressurize with antifreeze. Open the cold and hot faucets in turn until antifreeze is seen pouring out. Close the taps and turn the water pump off.
4) Drain water from the head using the hand pump. Pour antifreeze into the bowl and pump it through. Pour more antifreeze into the bowl and let it sit.
5) Some systems are more complicated – with shore inlets, electric heads, macerator pumps, shower pumps etc. These systems will require a more complicated winterizing plan. Make sure to tailor a plan to suit the systems on your boat.
Despite the end of summer vacation, there’s still great weather for boating – Enjoy!