Water, Water Everywhere
By Rick Hudson
Adding a watermaker to your boat
For many cruisers, self-reliance is a mantra that applies to system repairs, food supplies and health care. If you ain’t got it, you don’t need it; or if you do need it, make it yourself. This includes water.
The Science: For these and other reasons it seemed a good idea to install a watermaker. All operate on the same principle. Seawater has about 35,000 parts per million (ppm) of salt. To turn it into a potable product, it needs to have the salt content reduced to 150 ppm.
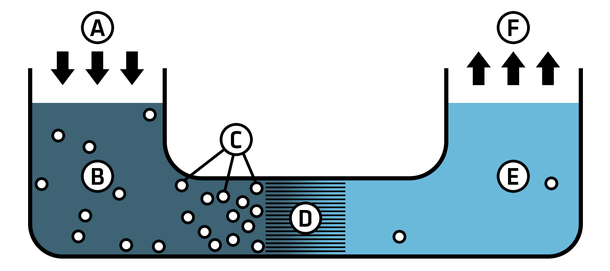
In Figure 1 a pressure pump (A) squeezes the seawater (B) to between 800 and 1,000 psi through a membrane (D). About 10 percent of the seawater permeates through (E), leaving its salt (C) behind, and is fed to your freshwater tanks (F). The remaining 90 percent, now slightly saltier, and often referred to as brine, is discharged overboard.
The process of freshwater transfer through the membrane is called reverse osmosis (RO), and is used worldwide to produce potable water. There are numerous manufacturers for the many applications—industrial for small towns, semi-potable for agriculture and golf courses, large marine tech for ships (especially cruise ships) and small marine for the likes of us. See sidebar for a list of RO manufacturers that have products for the pleasure cruiser.
The Project: First, I needed to define my needs. We carry 150 gallons of freshwater in two 75-gallon tanks. Together, they last about 14 days, meaning we consume about 10 gal/day. For one-week trips around the Gulf Islands or Desolation Sound we have more than enough, but the moment we pass Cape Caution and enter BC’s Mid Coast, it’s nice to have a freshwater backup. Looking around at what was available, there were a number of options based on (a) the hourly freshwater rate and (b) the unit’s power needs.
The hourly rate: Like everything in life, the more you want, the more it’s going to cost. You can get watermakers that run on very little power, don’t cost a lot and don’t produce much water. That’s life. At the other end of the scale… Well, you get the picture. We decided we wanted about 10 to 20 gallons per hour, so we could refill the tanks with half a week’s supply in a few hours.
The unit’s power source: There seemed to be three options to get power to run the high-pressure pump. For smaller units, you can tap off the 12-volt battery system and draw 10 to 20 amps. Larger capacity units needed five to 15 amps at 110 volts AC, which meant running the generator while making water, or having a large house battery bank and an inverter. The third option was to pull power off the engine (with a belt, the same as the alternator). Although a good idea in principle, finding space on the engine wasn’t an option for us.

The Reality: Naturally, while researching watermakers, one of the parameters noted was cost. They weren’t cheap. New, moderate-capacity units start at $6,000, and rapidly go up to more than double that. When operating on a modest budget, it didn’t make sense to spend that sort of money. As the Admiral pointed out, six grand buys you a lot of fuel to motor to somewhere that has freshwater; but only if they actually have water when you get there. –Pull Quote
Then a bit of serendipity occurred. A used Village Marine watermaker popped up on Craigslist. Like so much of the stuff on the internet, the guy selling it didn’t know the history of the unit, except that it was “old”, but hardly used. In that respect, marine watermakers are often like exercise bikes—bought, used a few times, and then put away. Was this one?
I read everything I could about the unit on Trawler Forum, and downloaded the user’s manual from the manufacturer. Apart from the membrane (which would have to be replaced, obviously) there aren’t a lot of things that can go wrong on basic units like this one. The more modern ones that self-flush and even self-pickle (more on all that later) are prone to problems, but the early units just had a compressor modified to handle seawater, and a membrane. The rest was basic plumbing, albeit some of it at high pressure.
This unit ran on 12 volts DC, drawing 16 amps. That was OK. The house batteries could handle that for an hour or two even without the alternator or generator running. The unit was a Little Wonder LW-145 where the 145 stood for 145 gal/day. That was six gallons (23 litres) per hour..
I went and had a look at it. The metal case was scuffed, the hour-meter glass cracked and a thick layer of dust covered everything. It didn’t present well. And it was just the desalinator; the front-end filters and valves weren’t there. No matter, those were cheap and readily available. The basics looked sound and the hour-meter, when I picked the glass out, showed it had run for just 16 hours. I held my breath and bought it. I reasoned the parts, and especially the stainless-steel compressor, were worth it.
The Work Begins: Another plus was that the membrane was a standard unit, although also sold through the manufacturer as a private label. They were available online for US$450, then US$350 and finally I found a supplier at US$250. That was encouraging.
I also needed to change the compressor oil, and here I ran into a problem. I could buy a quart of the stuff from the manufacturer for a vast amount of money, but while emailing back and forth with their service department (they were very helpful on a number of topics) they advised that if I couldn’t get their stuff (I told them I lived in deepest, darkest Canada), I could use 15W-40 hydraulic oil.
That sounded easy, but my local NAPA dealer advised he knew it as “tractor hydraulic oil” and it only came in 10-gallon drums. Further research revealed that hydraulic/compressor oil is just regular oil with the detergents removed. Regular oil may be used, but the detergents foam under pressure and are best avoided.
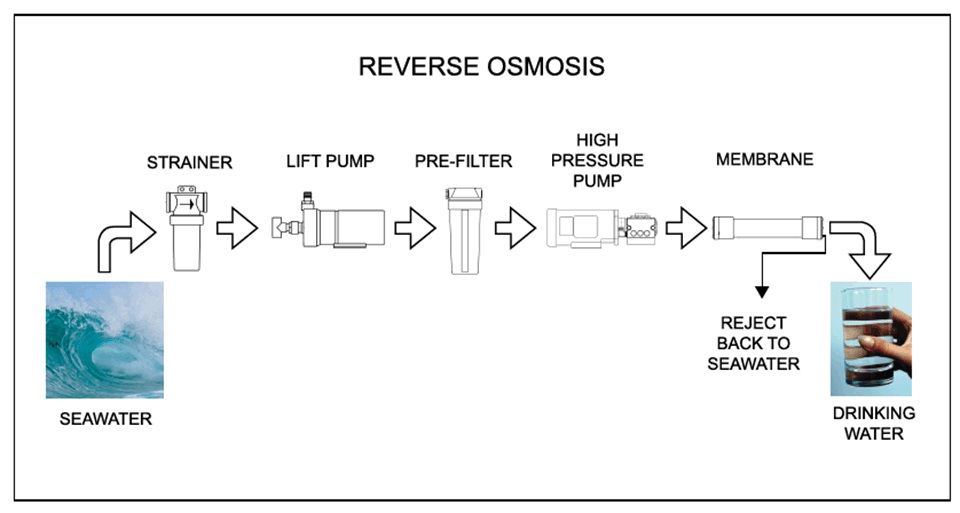
To make good drinking water from seawater, you need good feedstock. See Figure 2. Starting at the intake, the manual suggested a dedicated inlet with a regular lift pump to prime the high-pressure pump, because the latter didn’t like to run dry. And the raw water had to be clean. I didn’t like the idea of adding another hole to the hull and adding yet another pump.
On our boat, the anchor wash-down had its own inlet, strainer and pump, which killed a few birds with one stone. This went against what the manual recommended—dedicated inlet and dedicated low-pressure pump—but I hated to waste what was already installed.
The manual suggested two pre-filters of 25 micron and five micron before the RO unit. They were easily bought at my local swimming pool and irrigation centre. Some 5/8-inch hose, barb fittings, two and three-way valves and the basic system came together.
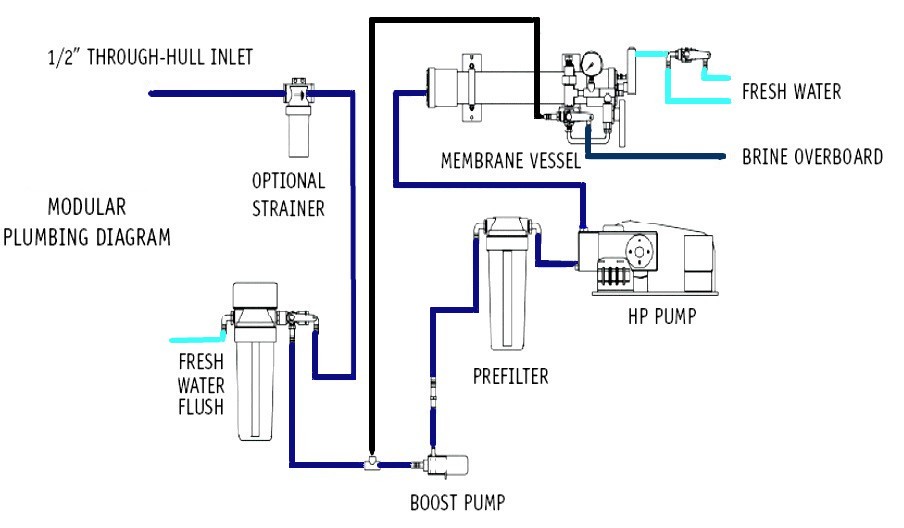
There was the nagging issue of flushing. See Figure 3. Membranes don’t like to be left with seawater in them when not in use. So, I tapped into the boat’s freshwater system beyond the freshwater pump and ran a line to the new installation. Because RO membranes also don’t like chlorinated water (most potable water has chlorine in it if it’s city water) the freshwater line went through a carbon filter (also available at the swimming pool store) to remove chlorine, before going through the two pre-filters and the desalinator.
Thus, by switching from raw seawater to freshwater as the feedstock, I could purge the entire system with clean freshwater when leaving it inactive (for up to 10 days). The freshwater flush also discouraged any marine growth from getting any ideas about residency.
The desalinator’s output also needed some valves. When you start the unit, the initial gallon or two of fresh isn’t worth keeping. This was bled off into a bucket. As the bucket filled with progressively fresher water, I filled a clean mug and tested the quality with a total dissolved solids (TDS) unit, which you can get online, or at your local aquarium store for $30. The rest of the seawater (the brine) went back into the sea via a previously unused thru-hull above the waterline.
The membrane manufacturer warned that the membrane came pickled in a solution, which would take up to two hours to purge. When I first ran the unit (Figure 4), I held my breath—hey, water ran through the unit. I switched on the high-pressure pump and slowly closed the RO valve so the pressure in the membrane rose to 800 psi. (There’s a built-in gauge.)
Water began to trickle out of the freshwater side, and a bucket began to fill. A flow meter registered seven gal/hr. We were cooking! After a while I tested the “product.” The TDS meter read 200 ppm. Over half an hour it had dropped to 160 ppm. I ran some into the cup and tasted it. There was no taste. I passed a sample along to the Admiral. She, who can taste cilantro in a green salad at 50 paces, pronounced it “fresh.”
After more purging, I installed the unit in the boat, re-ran the pumps, switched the product flow to the water tanks, and watched as the level slowly rose. It was a satisfying sight. Later, I switched the product output to the bucket again (now empty) and switched the input from seawater to freshwater, to flush the salt and sea critters out of the system for a few minutes.
Still later, I rinsed the 25 and five-micron filters in the bucket. The 25-micron one, being first in line, had some greenies, but that was the result of where I’d chosen to run the system. In a cleaner anchorage, the filter stays cleaner.
Other Thoughts: The RO manual went to considerable pains to explain that warmer seawater produced a better transfer of freshwater through the membrane. Membranes are rated at 25° C/77° F. So, in the tropics RO works most efficiently. On our cool coast, seven to 10 percent product is more typical. One way around that would be to put a heat exchanger on the generator, which usually runs when the desalinator is on, and run the seawater feed through its secondary side to preheat the feedstock from 11° C/52° F to something closer to 20° C/68° F before it arrives at the watermaker. The jury is out on this, but, if a handy heat exchanger turns up on Craigslist, I will add it to see what the improvement is.
One thing to consider when planning to install a watermaker is, when will you use it? We initially thought we’d run it at the end of the day when the generator was running to top up the batteries, but we found this wasn’t possible. In marinas, you definitely don’t want to take in the surrounding water (sewage and toxic paints, to mention just two).
At anchor we found that a bay could be clean when we started, but a shift in tide would turn a clear water column into a green slime soup in short order. It turned out we did our best watermaking when underway in open water, where the chance of clouding the strainer and 25-micron filter were less likely.
As mentioned earlier, when putting the unit in long-term storage it’s necessary to “pickle” the membrane. This involves first flushing with a low pH or acid rinse (details available online) and then a high pH or base rinse. Those two rinses leave the membrane clean. A final (third) rinse with sodium metabisulfite (used in brew shops to sterilize bottles) effectively pickles the membrane, so it can be left for long periods in a flooded state.
All hoses before and after the desalinator should be above the unit, so when left idle, the membrane is full. To deal with the three rinses, it’s best to have a line which loops from the output back to the input, so you only use limited amounts of acid, base and pickle solutions. See the line marked black in Figure 3.
Finally, for every cheap solution like buying and refurbishing an old desalinator, there’s a very cheap alternative. A mechanically minded friend bought a RO pressure housing and membrane online, pulled the pump off his home pressure washer, purchased the plumbing bits at his local irrigation store and put the whole thing together for under $1,000. The jury is still out on how long the pressure pump will survive in the saltchuk, but 10/10 for engineering acumen!
Now, if you’ll excuse me, I need to take a long, hot bath on board. And there’s plenty more where that came from.